
CloudLog Linux Installation – Start hosting your own Cloud Based QSO Logger
I had to take a break from amateur radio for a few months due to moving to an apartment, a few other life issues that came up. When I came back, I decided to get a fresh start and look at my logging software. I’d always used DXKeeper, but as great as it is, I’m growing old of the mid 2000’s look and feel of most amateur radio software. That’s when Robert, KD2UCJ over at my Military focused Amateur Radio Club, Flag and Torch Society recommended I check out CloudLog.
The Linux server installation documentation wasn’t the best (sorry MagicBug) Php7.x is end of life, so I’m writing this with a video aid to get people who would like to self host it up and running. Their docker image is a much easier way to go to give them credit, and to be fair you can’t explain EVERYTHING about linux in a wiki targeted at specific software. I would like to say that MagicBug provides hosting for you for £4 a month, which isn’t a bad deal for what it is.
Requirements:
- A Debian 12 Server OR Ubuntu 22.04 LTS Server Instance
This can be on your own hardware or a VPS like a $5 Solution at Linode
If you go with the VPS Option, Please use a Reverse Proxy or another method to form an encrypted connection as otherwise, your credentials are sent in clear text on login! - 1GB Ram
- 12 GB Of Storage (Just be be on the safe side)
Creating a new User
We are starting at square one. This assumes you have installed Ubuntu 22.04 LTS or Debian 12, and have logged in as the root user. Here we will create another user, and get it added to the sudo group so that we may work with it.
Replace “kn4mkb” with your desired username below:
apt-get install sudo
adduser kn4mkb
You can press enter to skip the questions asked, but make sure to answer “y” when asked if the information is correct.
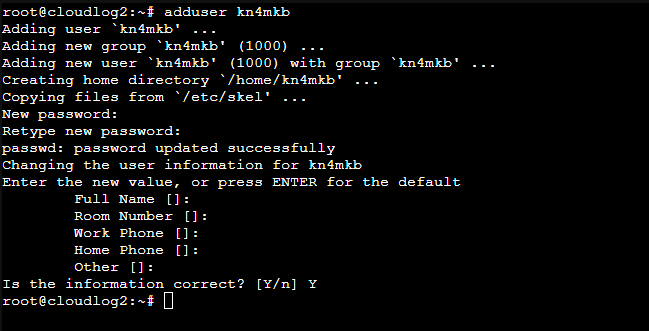
Now we will add this user to the sudo group, so it may be used instead of root. To do this issue the command below, again replacing “kn4mkb” with the username you used above.
usermod -aG sudo kn4mkbNow we will swap over from root to our new user (again replace “kn4mkb” with your username):
su kn4mkb
Installing the Requirements and Web Stack
Great, now lets get to installing all of the required software packages. Just repeat after me:
sudo apt-get update -y
sudo apt-get upgrade -y
sudo apt install git apache2 php libapache2-mod-php php-cli php-mysql -y
sudo apt install php-mbstring php-curl php-xml mariadb-server -y
MariaDB Configuration
The command below will make sure your MariaDB installation is secure. It will ask you various questions that need to be answered ‘y’ or ‘n’.
sudo mariadb-secure-installationUnless you have a special case, and can answer No (‘n’) on everything except for:
Remove anonymous users? [Y/n] Y
Disallow root login remotely? [Y/n] Y
Remove test database and access to it? [Y/n] Y
Reload privilege tables now? [Y/n] Y
Now we will start the Database Server and Create the User/Database.
sudo systemctl start mariadb.service
sudo mariadb
Your prompt will change to the MariaDB prompt “MariaDB [(none)]>”.
We will now create the database, and a user that can use it.
Below I have used the username “cloudloguser” and password “password123”. Although this user is really only useful internally, I still advise you use something else.
CREATE DATABASE db_cloudlog;
CREATE USER 'cloudloguser'@localhost IDENTIFIED BY 'password123';
GRANT ALL PRIVILEGES ON db_cloudlog.* TO 'cloudloguser'@'localhost';
FLUSH PRIVILEGES;
exit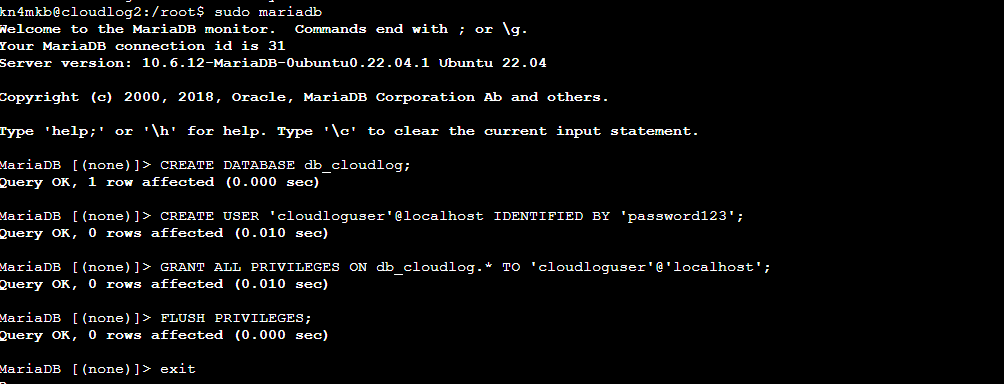
Installing Cloudlog to the WebServer
Here we will remove the default “index.html” file, and replace it with the Cloudlog Application.
sudo rm /var/www/html/*
sudo git clone https://github.com/magicbug/Cloudlog.git /var/www/html
Now we will set the correct permissions so that Cloudlog can write and execute where it’s needed:
sudo chown -R root:www-data /var/www/html/application/config/
sudo chown -R root:www-data /var/www/html/application/logs/
sudo chown -R root:www-data /var/www/html/assets/qslcard/
sudo chown -R root:www-data /var/www/html/backup/
sudo chown -R root:www-data /var/www/html/updates/
sudo chown -R root:www-data /var/www/html/uploads/
sudo chown -R root:www-data /var/www/html/images/eqsl_card_images/
sudo chown -R root:www-data /var/www/html/assets/json/
sudo chmod -R g+rw /var/www/html/application/config/
sudo chmod -R g+rw /var/www/html/application/logs/
sudo chmod -R g+rw /var/www/html/assets/qslcard/
sudo chmod -R g+rw /var/www/html/backup/
sudo chmod -R g+rw /var/www/html/updates/
sudo chmod -R g+rw /var/www/html/uploads/
sudo chmod -R g+rw /var/www/html/images/eqsl_card_images/
sudo chmod -R g+rw /var/www/html/assets/json/Now to make sure the apache webserver port is open, and then give it a restart:
sudo ufw allow in "Apache"
sudo systemctl restart apache2.service
If you are running Debian Server, you may have to use the following command to open your web-server port instead:
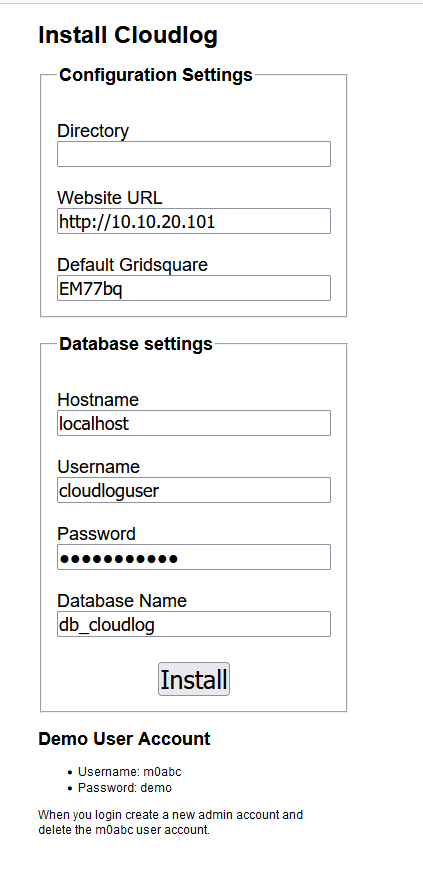
sudo iptables -I INPUT -p tcp --dport 80 -j ACCEPTYou should now be able to navigate to http://your-server-ip/install
Just fill out your database name, user and password created above, and press the Install button. After hitting install, please give the server a good minute or two to install before proceeding to the next step.
Cloudlog User Creation and First Login
You should now be able to navigate to http://you-server-ip/ and login with the default admin username: “m0abc” and password: “demo”.
Create an admin account by navigating to the “User Accounts” menu here:

Make sure to change the User Role to Administrator. You can now log into your new account and delete the demo account.
Next Use the same “Admin Menu” drop down you used to get to the User Accounts, and select “Update Country Files”, and select “Update DXCC Data”.
After the Install
Once you’ve used the log and found no errors, you can safely disable “Developer Mode” by editing the file:
“/var/www/html/index.php”
and replace the word “development” with “production” in the lines:
#define('ENVIRONMENT', isset($_SERVER['CI_ENV']) ? $_SERVER['CI_ENV'] : 'development');
define('ENVIRONMENT', 'development');
Additional Information about the configuration, and automatic Update scripts can be found on the official Cloudlog Wiki Installation Page here.
Thank you, Spot on directions. I now have CloudLog set up on my home network and hooked to QRZ and created an API for netlogger. now all of my FT8 contacts are logged. extremely helpful, and easy to follow.
What exact version of Ubuntu are you using and php version?
I had this set up years ago with Ubuntu 18.4, but referring to my notes and trying to install on 18.4 again always ends in a fail on cloudlog install screen.
Using your instructions on 22.04 ends in the error of:
Error Number: 1146
Table ‘db_cloudlog.users’ doesn’t exist
ALTER TABLE `users` ADD user_clublog_name VARCHAR(255) DEFAULT NULL, ADD user_clublog_password VARCHAR(255) DEFAULT NULL, ADD user_clublog_callsign VARCHAR(255) DEFAULT NULL
Filename: migrations/018_clubloguserfields.php
Line Number: 14
I’m running Ubuntu Server 22.04 LTS with PHP 8.2, although that shouldn’t matter with the error you’ve gotten.
It looks as though either you are naming the database differently from the one you are inputting into cloudlog during the webui install screen, or the user you created to interface with the database does not have the correct permissions.
You can check your database with an sql client to see the database name.
I would also check the cloudlog log files to see if there is any more information.
After trying it on other PC’s virtualised or not, the same error is still there. The same even when a friend tried it on his server. If you get this error, the key is to just wait for a minute as cloudlog is still instaling. After a minute or so you will be automatically greeted with the login screen.
Glad you were able to figure it out. I will update the post to wait a moment after the install then.
Nice write up. I have installed cloudlog, everything looks good (diagnostics, etc.) but when I try to attach to GridTracker using the url/api/dbID I get an error. Looking closer, I see ‘wrong JSON’. Have you been able to connect to GridTracker? Would really like to see an additional post where you show connectivity to different databases – LOTW, QRZ ,etc. – and apps like Gridtracker.
Hi, thanks for this.
Would it work on a Pi with Raspbian?
bonjour,
j’ai suivi votre tutoriel avec succès.
Merci beaucoup.
tout semble fonctionner correctement à part un message :
A PHP Error was encountered
Severity: 8192
Message: Creation of dynamic property CI_Cache::$file is deprecated
Filename: libraries/Driver.php
Line Number: 188
Avez vous une idée du problème ?
désolé, je peux comprendre l’angalis mais je ne l’écris pas
73’s from F4JWS