
Node to Node and Chat Linking via AXIP in BPQ32 and LinBPQ
This is a short add-on to the tutorials I’ve already done on setting up either LinBPQ on Linux, or BPQ32 on Windows. The following guide will show you how to perform Node to Node Linking via IP on both BPQ32 and LinBPQ. This will allow you to fill in gaps in RF, or link distant running nodes together so that RF users can hop between them. We will also explore linking that CHAT applications, which allows users of your node to chat with users of other nodes.
Port Forwarding and Opening
The first step is to expose the port we will be using for linking to the outside web. This port will be the one that our nodes use for node to node communication. The steps to making sure your port is allowed on your operating system can vary by OS.
On Windows:
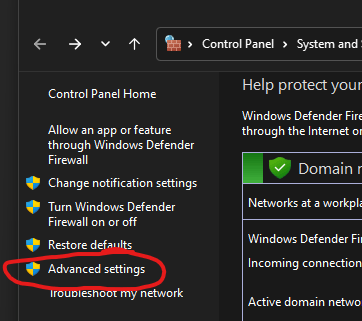
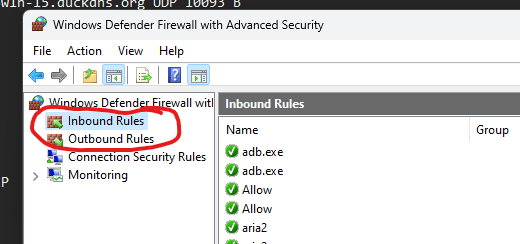
Open a “Run” Dialog by pressing WIN + R. In the field type “firewall.cpl” and press OK/Enter. Click Advanced Settings on the Left Panel, and a new windows should open. Right click “Inbound Rules”, and add a new rule. Chose the “Port” option, and press next. Check the option for “UDP”, and enter port: 10093. Chose next twice more to Allow the Connection. Name the rule whatever you like. Repeat the Process for the “Outbound Rules” Tab.
On Linux
this can vary by your firewall solution(if you have one). I will provide a command you can run that will work with the most common. It won’t hurt to run one you don’t know here, as it will just give you an error if that particular application is not installed:
sudo ufw allow 10093
sudo iptables -I INPUT -p tcp --dport 10093 -j ACCEPT
sudo iptables -I OUTPUT -p tcp --sport 10093 -j ACCEPT
Forwarding the port on your router
The last step for making sure your ports are properly setup is to forward incoming UDP connection on port 10093 to your internal host. This process varies greatly by router type so I can’t cover everything here. Just know, you need to Forward UDP PORT 10093 to your Nodes Internal IP.
Adding the AXIP Port to your Configuration file
We now need to add the “AXIP” port to our nodes configuration file. This is what will allow us to control and use outbound connections over IP. Open your bpq32.cfg file for editing, and navigate to the end of your “Ports” section. Just below “ENDPORT” for your last port, add the following:
PORT
    PORTNUM=4
    ID=AXIP Link
    DRIVER=BPQAXIP
    QUALITY=192
    MINQUAL=145
    MAXFRAME=4
    FRACK=5000
    RESPTIME=1000
    RETRIES=5
    PACLEN=256
    CONFIG
    MHEARD
    UDP 10093
    ;AUTOADDMAP
    BROADCAST NODES
ENDPORT
Take care to change the PORTNUM value to one that is higher than your last one used.
In itself not much here is significant except “AUTOADDMAP”. AUTOADDMAP is suggested among almost all configuration examples, but is a security risk. You can see why here. I’ve left it here, commented out in case you want to use it anyways. You would just remove the “;” before the statement. It handy because it allows you to give your IP/Host to others to add as maps, and your node will automatically create routes to them once those packets are received. But this also means anyone can use it to connect to your node and do whatever they please with it.
We will add a few more lines to the above new port. These lines are your “maps”. This is what tells your node to broadcast frames to to say “hey im here”. You will need your partners node IP or HOST name, as well as their node and application callsigns with SSID. For example, my Node is KN4MKB-7, by BBS is KN4MKB-11, and my CHAT is KN4MKB-12. Using this information, you add the following lines right above “ENDPORT” on our new AXIP port. In the following example, I’m linking with a node at xlx.flagandtorchsociety.com, with the nodecall K2FTS-7, and apps at K2FTS-11 and K2FTS-12.
    MAP K2FTS-7 xlx.flagandtorchsociety.com UDP 10093 B
    MAP K2FTS-11 xlx.flagandtorchsociety.com UDP 10093 B
    MAP K2FTS-12 xlx.flagandtorchsociety.com UDP 10093 B
All and all, your new port will look something liek this:
PORT
    PORTNUM=4
    ID=AXIP Link
    DRIVER=BPQAXIP
    QUALITY=192
    MINQUAL=145
    MAXFRAME=4
    FRACK=5000
    RESPTIME=1000
    RETRIES=5
    PACLEN=256
    CONFIG
    MHEARD
    UDP 10093
    BROADCAST NODES
    MAP K2FTS-7 xlx.flagandtorchsociety.com UDP 10093 B
    MAP K2FTS-11 xlx.flagandtorchsociety.com UDP 10093 B
    MAP K2FTS-12 xlx.flagandtorchsociety.com UDP 10093 B
ENDPORT
Great, now lets move on to get those CHAT applications linked!
Linking the CHAT Applications
Now to link those chats together, each user should open their CHAT Management page located on their node management server. You can find this from the node home page at http://YOURNODEIP:8012. Once there go to the “Configuration” Tab.

On the Configuration tab, add the following under “Nodes to link to”
#THEIRALIAS:THEIRCHATAPP-12You should replace THEIRALIAS with their Node Alias. You should replace THEIRCHATAPP-12 with their chat apps Callsign+SSID that they have specified on their application line for CHAT.
Once finished it should look like this:

Click Save -> Restart Links.
Alternatively, you can open chatconfig.cfg, and place the same format for the “OtherChatMoNodes” option , and restart the node for the same effect, but the above is much easier.
Try it Out
Upon restarting the links, one user should now be able to open their CHAT application and see users connected to the linked nodes chat, and talk with them!

The node status page should also show the links as well!
Just excellent write ups and I can’t thank you enough for your hard work and obvious passion. You have saved me a ton of time and I ran a BBS in the early 90s.
On your linux iptables rules to allow UDP port 10093, you are allowing tcp and it should be udp.
sudo ufw allow 10093
sudo iptables -I INPUT -p tcp –dport 10093 -j ACCEPT
sudo iptables -I OUTPUT -p tcp –sport 10093 -j ACCEPT
Thank you again! Duane – AC0ZH
what if you don’t have a patner? what map info would you use.