
Direwolf and JNOS for Modern Packet Radio
I’ve been doing deep dives into packet radio. Most of the time I make notes on theses adventures, but decided I should probably blog these as well. That way everyone can benefit. So this won’t be the most pretty post, but it will get you up and running. Our goal is to setup JNOS with Direwolf to create a BBS, so lets get to it.
Direwolf Setup
This post will assume you can do the bare minimum of configuring Direwolf for your radio, and have audio/PTT working. If you need a quick rundown on Installing Direwolf, check out TheTechPreppers post here. So we will get into the packet / BBS targeted tweaks:
Make sure to set your modem for the VHF or HF bands
#VHF:
MODEM 1200 E+ /3
#HF:
MODEM 300 1600:1800 7@30 /4
Now some tweaks to make things usable, modifications to TXTAIL, and TXDELAY may be needed for your radio if it doesn’t key fast enough or keys off too quickly:
TXTAIL 20
PERSIST 63
TXDELAY 50
SLOTTIME 10
DWAIT 20
JNOS Patching, Compilation and Installation
JNOS is a beast, so there a lot of different ways to skin the cat, and a lot of cats to skin, so lets dig into it.
First we need to download JNOS, and perform a patch that will allow us to stand up our own user enabled tunnel interface for it.
Downloading JNOS
mkdir jnos
cd jnos
rsync -a www.langelaar.net::official .
Patching JNOS for non root tunnels
Once it’s downloaded, we need to make a patch to make it useful for us, so use your favorite editor to open up config.c, and find the following line:
"attach tun <name> <mtu> <devid>" },We will just be adding <devname> at the end so it looks like this:
"attach baycom <name> <mtu> <devname>" },
Compile JNOS
Now we will compile the binary and create the folder it will live in
make clean
./configure
make
sudo make dir /jnos
sudo chmod 777 -R /jnos
cp -rp jnos jnospwmgr usage /jnos
Extract and Run the Installation Script
(I know, I know) it’s a lot, but like I said, this thins a beast, so care with me.
tar xvzf installerv2.2.tar.gz
cd installerv2.2
make jnosinstaller
./jnosinstaller
This should install everything to /jnos, but we won’t be able to run it quite yet, because we have to use our freshly compiled binaries from above.
Move back to the folder we first ran the rsync command with and compiled the binaries, and run the following command to replace the prebuilt binaries in /jnos with the ones we just created.
cp -rp jnos jnospwmgr usage /jnosCreate the Tunnel Interface
This interface will serve as the tunnel between JNOS and our host OS, so that the two may communicate. It is also the reason we made the patch above. The source for this method was detailed here by KB8OJN.
We will download his code used for creating the tunnel interface, compile it, and use it to create our tunnel.
wget https://kb8ojh.net/packet/tuncreate.c
gcc -o tuncreate tuncreate.c.
#Next we must be root
sudo su
#Make Sure to replace "YOUR_REGULAR_USERNAME_HER" with your username below
tuncreate tun0 YOUR_REGULAR_USERNAME_HERE
#You may have to run the below for your user to run ifconfig commands without root (just do it anyways)
export PATH=$PATH:/sbin
#Next we bring up the tunnel:
sudo ifconfig tun0 192.168.2.1 pointopoint 192.168.2.2 mtu 1500 up
Run Direwolf, Configure JNOS, Run JNOS
Almost at home base, first we need to run direwolf with the following command. This will start a serial interface that we need to note down for the JNOS configuration.
/usr/local/bin/direwolf -t 0 -p
#Optioanl Start with FX25 Forward error Correction: (Untested)
#/usr/local/bin/direwolf -X 16 -t 0 -p
Now we need to open up the JNOS configuration file, “autoexec.nos” in /jnos. We will add our direwolf serial port for the TNC, and make sure to comment out some settings that direwolf handles itself. We will also add the tunnel interface we created above.
#Open the "Config" File
nano /jnos/autoexec.nos
#Setup the VFH or HF port, comment out the existing one
#Make sure to replace "pts/2" with your above serial port form direwolf.
attach asy pts/2 - ax25 vhf 4096 256 1200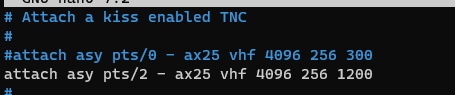
Comment out some of these options below, because Direwolf will handle delays etc.
Now we will add “tun0” to the line: “attach tun tun0 1500 0”, so that it reads like this:
attach tun tun0 1500 0 tun0
We will comment out the line that creates the tunnel interface in JNOS:
#shell ifconfig tun0 192.168.2.1 pointopoint 192.168.2.2 mtu 1500 up
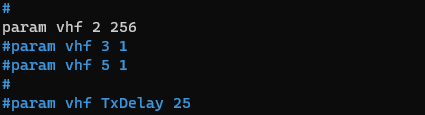
Last, we will scroll down to the optimizations for the RF port, and make some adjustments. This is what worked well for me, combined with the direwolf adjustments above:
This sets a static delay of 100 seconds between the end of a peer transmission, and the start of ours. You may be able to decrease this for better speed:
attach asy pts/2 - ax25 vhf 4096 256 1200
ifconfig vhf description "vhf - 1200 baud port"
param vhf 2 255
param vhf 3 100
Running JNOS
Now we just have to start JNOS, and if all is well, we will see a message pop up over in direwolf!
From the /jnos folder, run ./jnos
In another terminal, you can test your tunnel between the host and JNOS with:
ping 192.168.2.1
ping 192.168.2.2
#Or telnet into your jnos instance
telnet 192.168.2.2
The next post we will be configuring a linux host to act as an RF client.
Bonus
This is a little trick I picked up from packet-radio.net. We can setup direwolf and JNOS to always use the same port by creating a set of static serial devices to link both direwolf and JNOS into.
you will need to modify your direwolf.conf file with the following line:
SERIALKISS /dev/ttyq3 19200First create the interface with socat (Obviously install it if you haven’t already)
sudo socat -d -d -ly PTY,link=/dev/ttyq3 PTY,link=/dev/ptyq3Open another term, and then we CHMOD the devices so JNOS and direwolf can use them
sudo chmod 777 /dev/ttyq3
sudo chmod 777 /dev/ptyq3
Now back in the JNOS autoexec.nos file, we change the serial device to ptyq3, so it becomes:
attach asy ptyq3 - ax25 vhf 4096 256 1200Then startup as usual!
By installing and using screen you can start everything needed in their own screens with the following script:
#!/bin/bash
export PATH=$PATH:/sbin
#Prompts for sudo password here so that screens dont get hung up later asking for it
sudo whoami
sudo /jnos/./tuncreate tun0 takusr
sudo ifconfig tun0 192.168.2.1 pointopoint 192.168.2.2 mtu 1500 up
sudo screen -S interface -dm bash -c "sudo socat -d -d -ly PTY,link=/dev/ttyq3 PTY,link=/dev/ptyq3"
sleep 2
sudo chmod 777 /dev/ttyq3
sudo chmod 777 /dev/ptyq3
screen -S direwolf -dm bash -c "direwolf -d kn -c /home/takusr/direwolf-1200.conf; exec sh"
screen -S jnos -dm bash -c "cd /jnos; ./jnos; exec sh"
Keep in mind, if you stop these interfaces, you will have to manually kill kissattach, as it will keep your serial device hostage if you wanted to run it again.
Kill instances of screen and the tunnel when finished with the below:
#!/bin/bash
pkill screen
sudo pkill screen
sudo ip tuntap del dev tun0 mode tun
Both of these scripts can be found on my Github at https://github.com/modernham/modernpacketradio/tree/main
[…] attach here. Then we created our very own JNOS BBS instance, and configured it to run with direwolf here. This will not re explain the concepts we talked about before, but will serve as a guide on getting […]
[…] radio and the internet. Here at the ModernHam, we have tutorials for setting up both BPQ32 and JNOS,which are popular BBS implementations. Another popular opensource solution for Linux is Linfbbs. […]
I’m getting stuck at the step where, after compiling tuncreate, I run the the “tuncreate tun0 username” command. I get a response “tuncreate: command not found.”
I’m also reaching out to kb8ohj to see what he has to say. I’m assuming this is an elementary issue that anyone with an ounce of understanding would be able to overcome without help, so I really appreciate any help.
Thank you again!
-Tim NC0Q
running tuncreate as ./tuncreate was the solution, via kb8ojh.
-Tim NC0Q
Also, copy tuncreate to the /sbin directory and then add /sbin to the PATH via EXPORT. Worked for me. Strugled with this one for a few hours….