
Install and Configure LinBPQ BBS Packet Node on Debian Ubuntu and Raspbian
Video that follows along the post for those who are more visual.
We’ve already covered the windows counterpart to LinBPQ, BPQ32 here. We will basically go over the same concepts, as the configuration side is not too different. The LinBPQ software is much more convenient, as it can run on low powered computers like the raspberry pi LinBPQ is a software created by a fellow ham, John Wiseman G8BPQ. If you’re not following this is part of an all encompassing guide to reintroduce packet radio. This is an effort consolidate documentation for various packet radio systems and present it in a modern way for modern operating systems.
If you do not yet have direwolf configured, and do not have an existing packet TNC, check this out first to configure direwolf for your radio. I will also provide an example of using a serial TNC.
Prerequisites:
- A computer/server capable of running Debian/Ubuntu or Raspbian OS.
- A radio with a digital soundcard and PTT interface (Like the Digirig).
- Direwolf is installed and configured for your radio/soundcard or you have your own serial TNC.
See here if you do not yet have Dire Wolf configured and need a TNC
Create Our User
This part is not required if you already have a user to use that is part of the sudo group (you should if you have direwolf installed as part of the Ultimate Dire wolf Installation Guide.). I’ve added it here for linux newbies who are starting fresh.
We’ll create a user and add it to the sudo group, and give it permissions to use COM ports. I’ve included the sudo install command just in case. Run the following commands as root making sure that you elevate to root with “su -l”:
su -l
apt install sudo
adduser linbpq
usermod -aG sudo linbpq
usermod -a -G dialout linbpq
su linbpq
From now on, everything will be done under the context of the linbpq user. Do not use root, and do not use sudo unless the command requires it.
Downloading LinBPQ
Install some packages we need for downloading and installing linbpq, and then make a new folder for it, and move into it.
sudo apt update
sudo apt-get install wget unzip libcap2-bin screen
sudo apt install libpcap0.8-dev libasound2-dev libz3-4 zlib1g libminiupnpc17
mkdir ~/linbpq
cd ~/linbpq
If using 64bit Debian/Ubuntu issue the following command to download linbpq64
sudo apt-get update
wget http://www.cantab.net/users/john.wiseman/Downloads/Beta/linbpq64
If using a Raspberry Pi, use the following command instead:
sudo apt install libpcap0.8-dev:armhf libasound2-dev:armhf libz3-4:armhf
sudo apt install zlib1g:armhf libminiupnpc17:armhf
wget http://www.cantab.net/users/john.wiseman/Downloads/Beta/pilinbpq
mv pilinbpq linbpq
If using a Raspberry Pi 5, you must also add the following to the bottom of your /boot/firmware/config.txt and then reboot before starting linbpq.
kernel=kernel8.imgNext, mark the file as executable:
#Pi Users:
sudo chmod +x linbpq
#64 Bit Users:
sudo chmod +x linbpq64
Next, run the following command to allow linbpq to use ports below 1024.
#Pi Users
sudo setcap "CAP_NET_ADMIN=ep CAP_NET_RAW=ep CAP_NET_BIND_SERVICE=ep" linbpq
#64 Bit Users:
sudo setcap "CAP_NET_ADMIN=ep CAP_NET_RAW=ep CAP_NET_BIND_SERVICE=ep" linbpq64
Downloading the WebInterface
Create a new folder within our current working folder (linbpq) called HTML move into it, and then download the webfiles zip with wget and unzip them.
mkdir HTML
cd HTML
wget http://www.cantab.net/users/john.wiseman/Downloads/Beta/HTMLPages.zip
unzip HTMLPages.zip
You’ll send up with your HTML folder containing the following:

Configuring LinBPQ
The configuration for LinBPQ is all done via a text file. This text file is named “bpq32.cfg” which needs to be located right beside of the “linbpq” file we downloaded earlier. We will go ahead and create that now, and setup a basic linbpq node.
Go ahead and start direwolf in another terminal window, we will need it soon.
(If you are using a serial TNC, make sure it is connected, and you have the serial device path)
First move back up to the linbpq folder, and use “nano” to create a new file, bpq32.cfg
cd ~/linbpq
nano bpq32.cfg
Great, we have a black slate. Lets slowly start adding in the required lines to get our node up and running. We will walk through these slowly so that you understand what is going into the file as opposed to the regular wall of text template websites tend to just have you paste in.
Configuring Basic Node Settings and Information
First, paste in the following section, modifying as needed.
SIMPLE: This line simply sets some reasonable defaults for the config file for items that are not mentioned.
LOCATOR is your 6 digit grid/LAT/LON for reporting to the BBS packet Node Map.
You can also get more accurate by using a LAT/LON Like so:LOCATOR=37.710893,-85.886211
MAPCOMMENT is a short message displayed on the online BPQ Node Map here.
NODECALL is the callsign of your Node, you should include an SSID at the end.
NODEALIAS is an alternate way for users to refer to your node.
CTEXT is the message that is displayed when users connect to your node.
FULL_CTEXT: If 0, send CTEXT to L2 connects to NODEALIAS only
IDMSG: is a short UI broadcast text. Just replace the line below it with your own.
BTEXT is the actual Text within the beacon sent from your node. This can include an APRS formatted location string.
INFOMSG is the text that is displayed when a user enters the “INFO” command while connected to your node.
MAPCOMMENT is a short message displayed on the online BPQ Node Map here.
IDINTERVAL is how often we broadcast our ID Message in minutes.
BTINTERVAL is a the amount of time between beacons are sent from your node.
NODESINTERVAL: Nodes broadcast interval in minutes.
EnableM0LTEMap=1 Enables Map Reporting
SIMPLE
LOCATOR=EM77BQ
NODECALL=KN4MKB-7
NODEALIAS=MHNDE

CTEXT:
Welcome to the KN4MKB-7 LinBPQ Node.
HMNDE> BBS CHAT CONNECT BYE INFO NODES ROUTES PORTS USERS MHEARD
***
FULL_CTEXT=0

IDMSG:
TMH LinBPQ Node E-Town KY KN4MKB-11 BBS KN4MKB-12 CHAT KN4MKB-13 MUD
***

BTEXT:
!3742.65N/08553.17W#KN4MKB LinBPQ BBS/CHAT/MUD @ 144.930 and 14.105LSB.
***

INFOMSG:
Sysop KN4MKB.
MoreInfo: TheModernHam.com
BBS to connect to the BBS.
CHAT to connect to CHAT server.
MUD to connect to Multiplayer Game.
***

MAPCOMMENT=ModernHam LinBPQ Node, Elizabethtown KY<br>KN4MKB-7:144.93<br><a href="https://themodernham.com">TheModernHam</a>
EnableM0LTEMap=1

IDINTERVAL=15
BTINTERVAL=15
NODESINTERVAL=25
Now that we have some basics out of the way, directly under we will add some more settings:
Adding some Required Network Configuration Settings
These are actually not required because of the “SIMPLE” line above, but we will override some of them in case you need to change something.
PACLEN determines how much data goes into our AX25 frame. This setting is overridden in the Ports section individually.
BBS can be 1 or 0 depending if you want to include BBS support or not.
What the really means if if you want to allow users to use applications on your node.
I’m not sure why this is called BBS, but I assume the reason is before my time.
NODE can be 1 or 0 depending if you want to include switch support or not.
If 1 (default) users can use your node to connect out to others.
HIDENODES can be a 1 or 0 depending if you want to hide nodes that begin with a “#”
For the rest of the explanations, I will refer you to the official documentation over at:
https://www.cantab.net/users/john.wiseman/Documents/BPQ32.html
PACLEN=236
BBS=1
NODE=1
HIDENODES=1
Configuring the Ports
With BPQ, the ports are what allows us to setup data streams in and out of the application in various ways. Although this guide assumes you are using dire wolf, I will also provide and example of a serial port KISS TNC for those of you using that.
TNC Port:
If you are using direwolf, we are going to assume you have setup default settings for AX25 packet as outlined in the ultimate direwolf guide. . For example, the settings below should be in your direwolf.conf file adjusted for your radios needs:
BPQ Friendly Direwolf Config For VHF(‘#’ Lines are comments for explanation) :
MODEM 1200
#Only try retries 5 times.
RETRY 5
#Alow 3 seconds for reply.
FRACK 3
#EMAXFRAME is for AX25 V2.2, MAXFRAME for AX25 2.0
MAXFRAME 7
EMAXFRAME 14
#The length of the packet (More=higher chance of packet not being decoded).
PACLEN 128
DWAIT 0
#May need adjusted for your radio.
#TXDELAY 'warms' your radio up with a preamble tone before the packet.
#TXTAIL sends a 'post' stream of packets after the data packet
#to make sure the tail is not clipped off.
TXDELAY 25
TXTAIL 15
#This tells dire wolf to only try AX25 V2.2 connections twice.
#before falling back to AX25 V2.0
#Not enough stations support it.
MAXV22 2
BPQ Friendly Direwolf Config For HF(‘#’ Lines are comments for explanation):
#High CPU Usage, slightly higher decoding success
#MODEM 300 1600:1800 6@30 /1 E
#Low CPU Usage, might drop 1/1000 packets compared to above.
MODEM 300 1600:1800 7@30 /4 D
#After every packet, Dire Wolf generates a random number (0-255)
#If the number is lower than PERSIST, the radio transmits next packet.
#If its higher, the radio waits for SLOTTIME, and repeats the process.
#On HF, Dire wolf is more likley to intterupt a packet on the other end.
#This slows things down a bit compared to VHF to reduce that.
PERSIST 60
SLOTTIME 20
RETRY 10
FRACK 5
#On HF, we only want to send a single frame at a time.
#EMAXFRAME is for AX25 V2.2, MAXFRAME for AX25 2.0
MAXFRAME 1
EMAXFRAME 1
#On HF, we want a lower PACLEN to reduce the chance of error.
PACLEN 64
DWAIT 0
#May need adjusted for your radio.
#TXDELAY 'warms' your radio up with a preamble tone before the packet.
#TXTAIL sends a 'post' stream of packets after the data packet
#to make sure the tail is not clipped off.
TXDELAY 50
TXTAIL 30
#This tells dire wolf not to try AX25 V2.2.
#Not enough stations support it.
MAXV22 0
FULLDUP OFF
#Hack Fix for HF AX25. This helps reduce the chance of Dire Wolf interupting.
#incoming packet, by adding a static wait.
DWAIT 25
#Dire wolf warns against this, never had an issue.
#Can potentially cause a bit to be wrong in the AX25 body.
#Greatly helps weak signal reception if you don't mind
#the possibility of a wrong letter.
FIX_BITS 1 AX25
With that said, our first port configuration for LinBPQ will be added at the bottom of your bpq32.cfg file if you are using direwolf as your TNC. Take care to replace the “IPADDR” with a different one if dire wolf is running elsewhere.
The following is a good start for VHF Packet , for HF just change the ID Freq.:
PORT
   PORTNUM=1
   ID=144.930 MHz 1200 bps
   TYPE=ASYNC
   SPEED=19200
   PROTOCOL=KISS
   IPADDR=127.0.0.1
   TCPPORT=8001
   RESPTIME=1500
   MHEARD=Y
   BCALL=KN4MKB-7
   MINQUAL=100
   KISSOPTIONS=NOPARAMS
   CHANNEL=A
   FULLDUP=0
   NOKEEPALIVES=1
ENDPORT
If you are using a KISS SERIAL OR TNC, you will INSTEAD use the following:
Take care to replace the COM PORT with the serial port path for your TNC.
FOR HF, Set PACLEN to 64, and Change the “ID” Freq/Speed.
PORT
   PORTNUM=1
   ID=144.930 MHz 1200 bps
   TYPE=ASYNC
   COMPORT=/dev/ttyAMA0
   ;COMPORT=COM1 For windows
   SPEED=19200
   PROTOCOL=KISS
   KISSOPTIONS=ACKMODE
   CHANNEL=A
   FRACK=7000
   RESPTIME=1000
   SLOTTIME=100
   TXDELAY=200; Needs adjusted for your radio
   PERSIST=64
   RETRIES=10; may want to adjust as needed
   DIGIFLAG=1; Set to 0 for HF
   TXTAIL=40; Needs adjusted for your radio
   PACLEN=128 ; Set to 64 for HF
   MAXFRAME=4; Set to 1 for HF
   FULLDUP=0
   NOKEEPALIVES=1
ENDPORT
TELNET and HTTP Port
The second port we will create will be for TELNET access, as well as HTTP node management. This will go right under your TCP port above. You will want to replace a few things:
TCPPORT is the Port where the telnet server is listening.
HTTPPORT is the port where the HTTP sever is listening
SECURETELNET Without this option, users can use your telnet port to connect out other places via IP/Host.
CTEXT, which is the text that displayed when a user connects via telnet.
USER: I have two lines with USER here. One creates a SYSOP (admin) with the username ‘ModernHam’, password ‘PASSWORD123’ and callsign ‘KN4MKB’. You will want to replace that username/password with your own.
PORT
   PORTNUM=2
   ID=Telnet
   DRIVER=Telnet
   QUALITY=0
   CONFIG
   LOGGING=1
   DisconnectOnClose=0
   SECURETELNET=1
   LOGGING=1
   TCPPORT=8100
   FBBPORT=8101
   IPV4=1
   HTTPPORT=8080
   LOGINPROMPT=Username:
   PASSWORDPROMPT=Password:
   MAXSESSIONS=15
   CloseOnDisconnect=1
   CTEXT=Welcome to TMH LinBPQ Telnet Server\nEnter ? for list of commands\n\n
 USER=ModernHam,PASSWORD123,KN4MKB,"",sysop
ENDPORT
APRS-IS Connection
The following can go right below your telnet port if you wish, and enables APRS-IS communication. Make sure to replace the APRSCALL, LAT/LON DigiCalls with your own information. LAT/LON must be in the standard APRS format, (ddmm.mmN/S), and make sure to replace it within the OBJECT PATH line as well.
The Symbol and Symset can be found here. You can grab your own APRS passcode here.
Pay special attention to the APRSPATH Line. The number after here in the example (1) is refering to port 1 (the one we created above with dire wolf) to enable APRS on that BPQ port. If you add additonal radio ports, and want APRS on them, you may need to add additional APRSPATH lines here.
APRSDIGI
    APRSCALL=KN4MKB-10
    APRSPATH 1=APRS,WIDE1-1,WIDE2-1
    STATUSMSG=LinBPQ BBS Node E-Town KY
    Symbol=&
    Symset=\
    LAT=3742.39N
    LON=08553.10W
    APRSPATH 1=APRS,WIDE1-1,WIDE2-1
    BeaconInterval=30
    TraceCalls=WIDE,TRACE
    FloodCalls=USA
    DigiCalls=KN4MKB
    MaxTraceHops=2
    MaxFloodHops=2
    ISHost=noam.aprs2.net
    ISPort=14580
    ISPasscode=555555
***
Configuring the Applications
The very last bit on configuration, which will go at the end of the file will enable the BBS and CHAT and NODE applications.
The format is as follows:
APPLICATION <NUMBER>,<COMMAND TO START>,,<APPLICATION CALL>,<APPLICATION ALIAS>,<QUALITY>
Notice that each application callsign has it’s own distinct SSID. These need to be different than the node alias.
Afterwards LINMAIL and LINCHAT will actually make them start.
APPLICATION 1,BBS,,KN4MKB-11,MHBBS,255
APPLICATION 2,CHAT,,KN4MKB-12,MHCHT,255
LINMAIL
LINCHAT
Finishing Up
Great, so all together, you should have something that resembles the below:
(This is my complete configuration file)
SIMPLE
LOCATOR=EM77BQ
NODECALL=KN4MKB-7
NODEALIAS=MHNDE

CTEXT:
Welcome to the KN4MKB-7 LinBPQ Node.
HMNDE> BBS CHAT CONNECT BYE INFO NODES ROUTES PORTS USERS MHEARD
***
FULL_CTEXT=1

IDMSG:
TMH LinBPQ Node E-Town KY KN4MKB-11 BBS KN4MKB-12 CHAT KN4MKB-13 MUD
***

BTEXT:
!3742.65N/08553.17W#KN4MKB LinBPQ BBS/CHAT/MUD @ 144.930 and 14.105LSB.
***

INFOMSG:
Sysop KN4MKB.
MoreInfo: TheModernHam.com
BBS to connect to the BBS.
CHAT to connect to CHAT server.
MUD to connect to Multiplayer Game.
***

MAPCOMMENT=ModernHam LinBPQ Node, Elizabethtown KY<br>KN4MKB-7:144.93<br><a href="https://themodernham.com">TheModernHam</a>
EnableM0LTEMap=1

IDINTERVAL=30
BTINTERVAL=45
NODESINTERVAL=45

PACLEN=236
AUTOSAVE=1
BBS=1
NODE=1
HIDENODES=0

PORT
   PORTNUM=1
   ID=AX25 144.915 @ 1200 bps
   TYPE=ASYNC
   SPEED=19200
   PROTOCOL=KISS
   IPADDR=127.0.0.1
   TCPPORT=8001
   CHANNEL=A
   MHEARD=Y
   BCALL=KN4MKB-7
   KISSOPTIONS=NOPARAMS
   MINQUAL=100
   FULLDUP=0
   DIGIFLAG=1
   NOKEEPALIVES=1
ENDPORT
PORT
   PORTNUM=2
   ID=Telnet
   DRIVER=Telnet
   QUALITY=0
   CONFIG
   LOGGING=1
   DisconnectOnClose=0
   SECURETELNET=1
   LOGGING=1
   TCPPORT=8100
   FBBPORT=8101
   IPV4=1
   HTTPPORT=8080
   LOGINPROMPT=Username:
   PASSWORDPROMPT=Password:
   MAXSESSIONS=15
   CloseOnDisconnect=1
   CTEXT=Welcome to TMH LinBPQ Telnet Server\nEnter ? for list of commands\n\n
 USER=ModernHam,MYPASSWORD,KN4MKB,"",sysop
ENDPORT

APRSDIGI
    APRSCALL=KN4MKB-10
    APRSPATH 1=APRS,WIDE1-1,WIDE2-1
    STATUSMSG=LinBPQ BBS Node E-Town KY
    Symbol=&
    Symset=\
    LAT=3742.39N
    LON=08553.10W
    APRSPATH 1=APRS,WIDE1-1,WIDE2-1
    BeaconInterval=30
    TraceCalls=WIDE,TRACE
    FloodCalls=USA
    MaxTraceHops=2
    MaxFloodHops=2
    ISHost=noam.aprs2.net
    ISPort=14580
    ISPasscode=55555
***
APPLICATION 1,BBS,,KN4MKB-11,MHBBS,255
APPLICATION 2,CHAT,,KN4MKB-12,MHCHT,255
LINMAIL
LINCHAT
You can now save the file, and start LinBPQ with the following command:
#Pi Users
sudo ./linbpq
#64 Bit Users
sudo ./linbpq64
You should see the following:
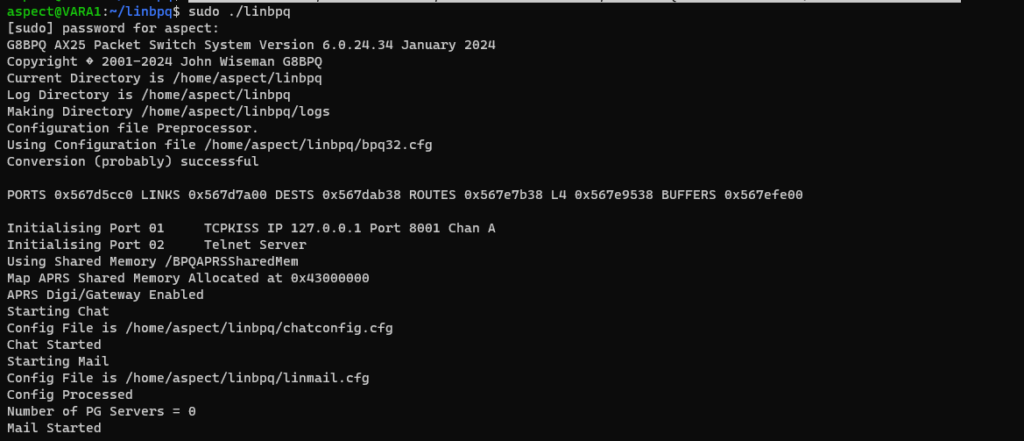
Managing your Node
Now that our node is running, we can interface with it in 3 different ways.
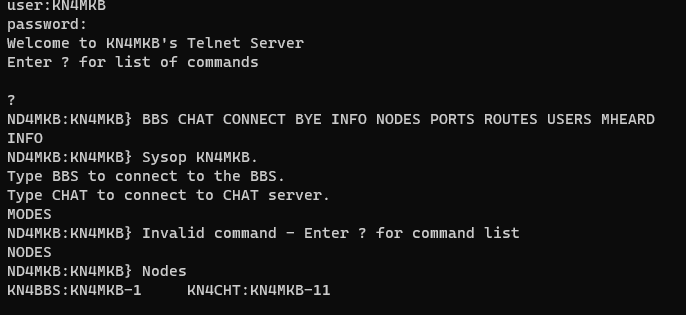
Connect via TELNET
Please keep in mind TELNET is not secure over untrusted lines. If reaching out via Telnet over the internet, everyone will see your login credentials.
With any telnet client, windows or linux we can connect to our bbs on the port configured (8100) unless you’ve changed it. Doing so will allow us to login with our SYSOP username and password we configured in the TLENET section. We can use the “?” command to see options, and run CHAT/BBS applications.
Managing via HTTP
Please keep in mind HTTP is not secure over untrusted lines. If reaching out via HTTP over the internet, everyone will see your login credentials.
We can also open a web browser, and connect to the http servers configured port (8080 by default) to manage settings and configuration. This will be where you do most of your additional configuration.
http://10.10.20.81:8080 For me
Using your Node to Connect to other BBS Nodes
Now that you have your own node, you may also use it to connect to others. Simply connect to your own via the web temrinal, or telnet interface, and issue the PORTS command to view how you may connect out. You can use the MHEARD <PORT_NUM_HERE> command to view what stations you have heard on a specific ports for ideas.
You can then issue a command like:
#AX25
CONNECT PORT_NUM STATIONCALL
#or for VARA
ATTACH PORT_NUM STATIONCALL
Start your Node at Boot
Create a new service file using the following command:sudo nano /etc/systemd/system/bpq.service
Paste the following into the new file:
[Unit]
Description=BPQ
After=network.target

[Service]
WorkingDirectory=/home/<YOUR_USER_HERE>/linbpq
ExecStart=/home/<YOUR_USER_HERE>/linbpq/linbpq
Restart=always
SyslogIdentifier=BPQ

[Install]
WantedBy=multi-user.target
Make sure to replace <YOUR_USER_HERE> with your username (without the brackets).
Use the following commands to enable and start and see status of linbpq:
sudo systemctl start bpq
sudo systemctl enable bpq
sudo systemctl status bpq
Conclusion
You now have your very own LinBPQ node configured as a BBS as well as a chat server. You can access it via radio, telnet or html. A lot could have gone wrong on this guide. If you run into issues, let me know in the comments below. BBS systems are not easy to configure. Try to be patient as you add functionality.
[…] As you know, I’m a fan of packet radio. I really wish there were more modern implementations, as almost all of the BBS and terminal software feels like it is stuck 2-3 decades ago. Some people like that. But getting a BBS node up in 2024 feels like ramming my head against a board full of rusty nails. Anyways, as I do these things, I want to document them for myself, and for others who may be trying the same thing so here’s my best shot. I really recommend running LinBPQ, as Linux servers tend to have more uptime. I have a guide on installing and configuring it as well, here. […]
Where are source codes?
It is unable to maintain binary blob file as new version of system is not compatible and I do not want install out-of-dated version of OS.
# ./pilinbpq
./pilinbpq: error while loading shared libraries: libz.so.1: ELF load command address/offset not page-aligned
[…] been working on a “Packet Radio Series” on my YouTube channel. The goal is consolidating lots of information about packet radio in a […]
[…] is a short add-on to the tutorials I’ve already done on setting up either LinBPQ on Linux, or BPQ32 on Windows. The following guide will show you how to perform Node to Node Linking via IP […]
[…] As a last post to the BBS portion of the packet radio series, I wanted to give a few ways you can actually connect to a BBS node within Linux and windows. If you want to setup your own node with BPQ, you can follow the guide here. […]
Hi … I followed the complete guide to install Linbpq. Everething was working fine (I also did the last part to start the node at boot). Everything was working (all items). However when I reboot the Raspberry Pi when I ask the status I get this message and linbpq is not started. I also can not start it manually with the cmd sudo ./linbpq
pi@raspberrypi:/etc/systemd/system $ ls
bluetooth.target.wants dhcpcd.service.d rc-local.service.d
bpq.service display-manager.service reboot.target.wants
dbus-fi.w1.wpa_supplicant1.service getty.target.wants remote-fs.target.wants
dbus-org.bluez.service getty@tty1.service.d sockets.target.wants
dbus-org.freedesktop.Avahi.service graphical.target.wants sshd.service
dbus-org.freedesktop.ModemManager1.service halt.target.wants sysinit.target.wants
dbus-org.freedesktop.timesync1.service multi-user.target.wants syslog.service
default.target network-online.target.wants timers.target.wants
default.target.wants poweroff.target.wants
dev-serial1.device.wants printer.target.wants
pi@raspberrypi:/etc/systemd/system $ sudo systemctl start bpq
pi@raspberrypi:/etc/systemd/system $ sudo systemctl enable bpq
pi@raspberrypi:/etc/systemd/system $ sudo systemctl status bpq
● bpq.service – BPQ
Loaded: loaded (/etc/systemd/system/bpq.service; enabled; vendor preset: enabled)
Active: failed (Result: exit-code) since Thu 2024-05-30 08:08:36 CEST; 35s ago
Main PID: 6798 (code=exited, status=200/CHDIR)
CPU: 2ms
May 30 08:08:36 raspberrypi systemd[1]: bpq.service: Scheduled restart job, restart counter is at 5.
May 30 08:08:36 raspberrypi systemd[1]: Stopped BPQ.
May 30 08:08:36 raspberrypi systemd[1]: bpq.service: Start request repeated too quickly.
May 30 08:08:36 raspberrypi systemd[1]: bpq.service: Failed with result ‘exit-code’.
May 30 08:08:36 raspberrypi systemd[1]: Failed to start BPQ.
pi@raspberrypi:/etc/systemd/system $
If you manually run the file with sudo ./linbpq what do you get?(With the service itself stopped)
[…] I’ve concluded the base packet radio series, where we went from an introduction to packet, BPQ32, all the way up to an TCP/IP Stack in Linux, it’s time to build my dream packet node. The is […]
I can’t tell you how much I appreciate your blog. I have gone from zero to hero by just following your instructions, getting direwolf and YAAC to work. Today I tried to get LinBPQ to work, and while it works, I can’t seem to get logged in via HTTP to configure, because the username/password I set in the terminal doesn’t work. Any idea what I might have messed up? I’m probably not even asking the question properly.
–Tim NC0Q
Thank you for your comment. I was also confused about this when I started, There is a difference between the SYSOP sign in, and the BBS/MAIL login. For the SYSOP option, you want to use the one configured in the terminal section of the config, and also make sure to use the SYSOP login link on the website. If you would like to log into the other options, I think a password must be set for that specific user within the application itself.
[…] configuration of LinBPQ itself, I’ll be following my previous guide, which you can find here: Install and Configure LinBPQ BBS Packet Node on Debian Ubuntu and Raspbian. If all holds up, that should take us from a new install to a working configuration of LinBPQ. We […]
I’m having a difficult time with my Ubuntu installation of LinBPQ and I’m hoping you can assist. File locations and even the name of the file changed due to the original location being down but when I completed my installation and configuration I attempted to start LinBPQ. I ran “sudo ./LinBPQ” and it returned:
./LinBPQ: 1: MZ����@��: not found
./LinBPQ: 7: Syntax error: word unexpected (expecting “)”)
Any advice would be greatly appreciated. Thank you in advance.
V/R
Greg Davis
KQ4JOC
Great article and video. I am sure I will have it up and running (in it’s very raw state) in the next week!
G7TWZ
everything installed but when I hit ./linbpq64 I got this
root@debian-12-aml-s905x-cc:/home/linbpq/linbpq# ./linbpq64
-bash: ./linbpq64: cannot execute binary file: Exec format error
I need guidance
KC1JFN
Just FYI, I just set up LinBPQ Version 6.0.24.75 June 2025 and get a ton of config file errors, parameters not recognized, etc.
CORRECTION: All errors were caused by me, apparently. Please disregard my last comment.
[…] https://themodernham.com/ultimate-direwolf-tnc-installation-guide-for-windows-and-linux/https://themodernham.com/install-linbpq-bbs-packet-node-on-debian-ubuntu-and-raspbian/ […]
Great tutorial! Thanks for what you’re doing and please keep it coming. One question I have, though everything seems to be working 100% .. when I access my node via RF from another radio it doesn’t recognize me as the SYSOP .. Commands such as EDITUSER return an error code of “Edit User needs SYSOP status” .. I’m accessing the BBS from the same callsign I configured in the telnet config. Any advice would be welcomed. Thanks!
Matt N2NFG
“I’ve been trying for about a year to get LinBPQ working with a TM-D700. I want to use the Kenwood’s built-in TNC. The Kenwood is available under USB0, but LinBPQ doesn’t communicate with it. Do I need to install AX25? If so, how do I need to configure it? You simply write in the PORT Async and enter /dev/ttyUSB0 — that doesn’t seem to work. Something is missing. LinBPQ starts without an error message. HELP” DO1ATM