Send Email from BPQ32 or LinBPQ with Winlink RMS
In order to forward email from your BPQ32 or LinBPQ node, you will first need to register with Winlink as a SysOp. You can find more information about registering and becoming a Winlink SysOp (System Operator) here. Once you have been granted access to the CMS Servers, you will be able to allow your node users to send email to outside email domains via RMS (Radio Mail Server). Lets take a look at what’s involved in getting this working.
CMS Configuration on the Telnet Port
Within the telnet configuration on your BPQ node, you must have your CMS login information, and tell BPQ to enable CMS connections. Under the “CONFIG” section of your telnet port, you need to have the following options: (Replace with your callsign and Winlink password)
CONFIG
   CMS=1
   CMSCALL=YOUR_CALLSIGN
   CMSPASS=YOUR_WINLINK_PASSWORD
At the Bottom of your BPQ Configuration File, we should also add a line for the RMS and BBS applications. This simply makes it so that using the command “RMS” will also connect a user straight to the Winlink CMS Server. It also enables the “BBS” command, and tells BPQ that the BBS is Application 1. I have chosen 3 for the RMS application number, as 2 was for CHAT. Keep in mind, this assumes your telent port is Port 1. If your telent port is different, you should change the “C 1” to “C N” where N is your Telnet port Number. Also replace YOURCALL with your callsign. This will also allow users to connect via the Winlink Express Application to YOURCALL-10 and send/receive email. It will also allow users to connect to YOURCALL-11 to go straight to your BBS application.
APPLICATION 1,BBS,,YOURCALL-11,URBBS,255
APPLICATION 3,RMS,C 1 CMS,YOURCALL-10
Optionally Advertise your RMS Gateway to Winlink
If you would like to advertise your Winlink RMS gateway to the Winlink servers (so that other users see it within winlink express when they look for nodes to connect to), you can optionally add a line like this under each port you want to advertise. More information about the option for this config line can be found on the Official BPQ website here. The format is as follows:
WL2KREPORT Service, Host, Port, Callsign, Locator, Hours, Freq, Mode, Power, Ant Height, Ant Gain, Ant Direction#This Line will advertise an RMS gateway on 144.915, at Grid EM77VS
#With the connection callsign YOURCALL-10 that is available 24 hours/Day
#With 50 Watts of Power, 25 Feet in height with 5 Gain antenna that's #Omnidirectional, and using VARA FM.
WL2KREPORT PUBLIC, api.winlink.org, 80, YOURCALL-10, EM77VS, 00-23, 144915000, VARAFM, 50, 25, 5, 0Setup BPQ to Winlink Gateway Forwarding
Now that we have CMS configured correctly, we can now setup the ability for users to send email via Winlink from your BPQ BBS node. Next, open your Winlink mail configuration from the web interface after using the SYSOP Sign In via the links on the top of the page, and make sure the main configuration matches the one I have here. Your BBS APPL NO may be different depending on your configuration from above.


Next, click over to the “Users” tab. On the bottom right black, next to the “Add” button, type “RMS” and then click “Add”. Next, make sure the only box checked for our new RMS user is “BBS”. Also enter the node callsigns Winlink password within the “CMS Pass” field. Last, click the “Update” button.

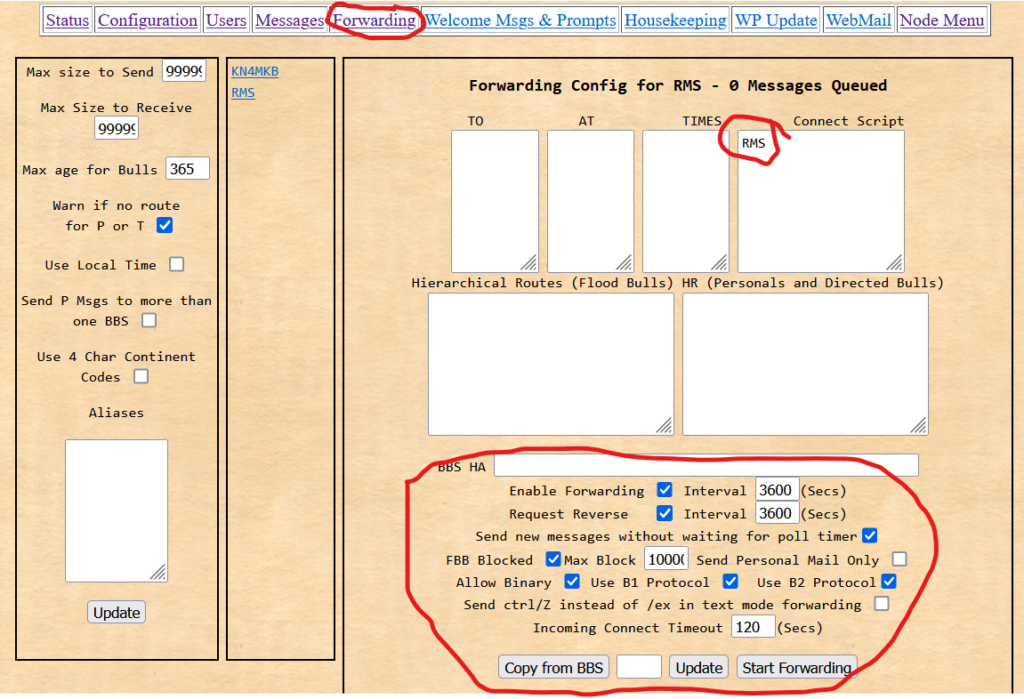
Once you have the RMS user created, navigate over to the “Forwarding” Tab from the top menu. Click the “RMS” user, make the options match the ones I have here, and then click “Update”

Restart BPQ, and this takes care of the base RMS/Winlink message forwarding. Users can now send messages to “RMS : EMAIL@DOMAIN.com” and the messages will be routed over the Winlink CMS Gateway to arrive at external email addresses.
Allow Node Users to Receive Messages from Winlink RMS
After the above settings have been configured, users may opt to have winlink mail received via the BBS. To do so, the user must use the “CMSPASS PASSWORD_HERE” to set their winlink password while in the BBS application, or a SysOp may enter it in their user profile within the BPQ application. Next, the user should enter the command “POLLRMS ENABLE”, to turn on polling for RMS messages. Now, once the SYSOP runs the command “FWD RMS NOW”, all messages for RMS users opting to have RMS polling should be downloaded to the node for viewing.
Hi, I have been following you in youtube and following your guides in TheModernHams.com. I set up a Direwolf and BPQ32. they are all running without errors, thanks to your guide. Now I’m following how to send mail from BPQ32 with Winlink RMS. I already am running RMS as sysop.
My question is where do I add this line
CONFIG
CMS=1
CMSCALL=YOUR_CALLSIGN
CMSPASS=YOUR_WINLINK_PASSWORD
in the BPQ32.cfg or Direwolf.conf?
I initially add it on the BPQ32.cfg but I got errors, oh now I have Audio out write error 6 on direwolf.
Please help
KC1JFN