
Winlink With ARDOP E-Mail over Ham Radio
There used to be a time when you can only use software like Winlink with expensive PACTOR modems. This is no longer the case with many new SoundModems and protocols available. Once such protocol we will be talking about is ARDOP, The Amateur Radio Digital Open Protocol. It was made to replace WINMOR by providing better speed, and a more robust connection, and it does it well.
Winlink Express
Winlink Express is just the “Email Client” for the system. It allows you to do the basics. You can put emails in the outbox, view received ones, and even put requests for weather reports (GRIB files) in our outbox. You will need it however to actually use ARDOP for email. Surprising huh?
You can download it over on the Winlink Website here: https://winlink.org/
Upon Installing and opening it, you will be greeted with a registration screen that’s pretty straight forward. Just create a password, and your email will be “yourcall”@winlink.org. Once you get that up and running, ARDOP is next.
ARDOP
ARDOP uses “sound cards” like most ham radio digital interfaces. If you’re not familiar with them, you need to be to start using ARDOP. Once you are ready, select “ARDOP” from the Open Session Dropdown. You will be greeted with this:

Not much to setup, you should click “Settings -> ARDOP TNC SETUP” To configure the sound card you will be using, as well as your transmit power level. Moving on, you should take a look at “Settings -> RADIO SETUP” to configure things such as CAT control, PTT and other technical aspects. You can use ARDOP with digital VOX, but I strongly recommend a PTT Line to reduce connection issues.
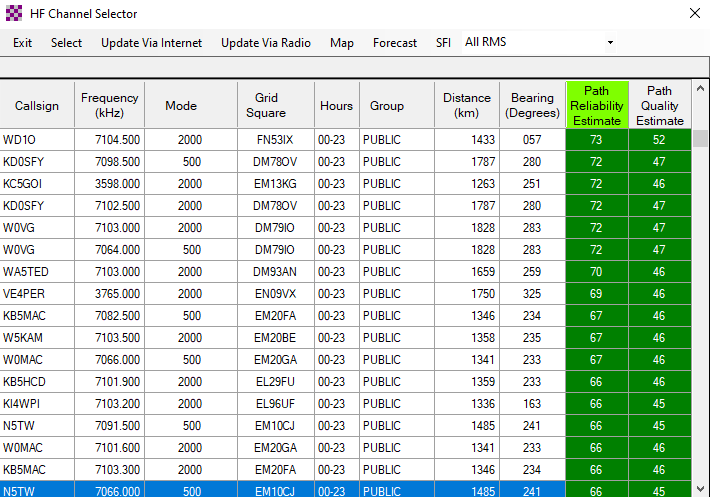
Next, you should select a channel. Remember when you put your grid square in? Well ARDOP is going to use that information to predict your best chances of success when it comes to finding a station. This could still take some playing around, but you will eventually find one that works. Select a channel, that looks good, and you should be ready to connect.
Once you have your channel loaded, you should make sure your radio is on the Dial Freq, and you are go for launch. Hit start, cross your fingers and wait for the magic to happen.
If your lucky, you should see a connection to the chosen node, and hear the nodes reply over your radio.
Any outgoing mail will be sent out, and incoming mail will be downloaded for your use.
And That’s it
Pretty simple system here. It will take some playing around to get your settings right. You may skim over stations for a while to find a good one that works for you. But once you do, feel good in knowing that you have that communication link if you loose internet access.