
Ultimate Direwolf TNC Installation Guide for Windows and Linux
This is this follow up to my introduction on Packet Radio. Direwolf is a software TNC, and one of the best things to happen to packet radio in the 21’st century. Gone are the days of expensive Kantronics TNC‘s. Direwolf gives us a free, opensource TNC, that is highly customizable for just about every need, and runs on about any system we have laying around. The TNC is the foundation of any packet radio system, that’s why we are starting here. This will serve as the reference point for every other tutorial we do in the packet radio series. But with great power comes some type of learning curve. That’s why I’m making the Ultimate guide to Direwolf TNC for Packet Radio. If you’re more of a documentation buff, and don’t need anyone to hold your hand, you can dig into the official docs here.
The following guide will get you a working direwolf installation with basic configuration. Proceed to the next post to tweak the settings and get it tuned for your radio. Although it includes instructions for VOX, I highly discourage it, and you will most likely not have a good time on anything other than APRS.
Table on Contents
Getting Started
Windows Installation
Debian/Ubuntu/Raspbery Pi OS Linux Installation
-Install Linux Requrments
-Compile Direwolf for Linux
-Get Linux Soundcard
-Set Linux Volume Settings
-Get Linux Serial Interface
Basic Configuration
–Requirments
–Set Audio Device Config
-Set PTT Configuration
-Set Modem Speed Configuration
-Enable FX25
-Set Tweaks
Test Configuration
Troubleshooting
Start at Boot
Video Guide
Getting Started
Please make sure you have your soundcard interface connected to your computer at this time, as well as the PTT interface if you intend on using PTT instead of VOX. Turn your radio on to about 20% of it’s volume, with open squelch to start with. Turn off any battery saving feature on your radio.
Windows Installation Guide
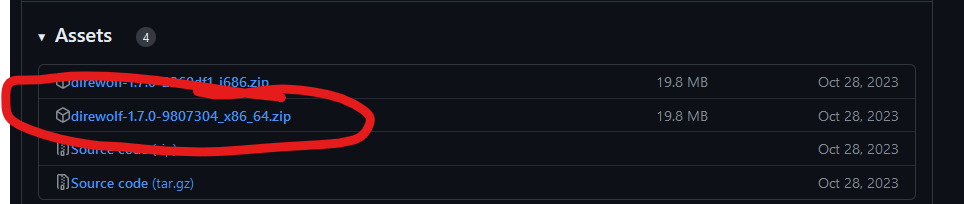
- Please visit https://github.com/wb2osz/direwolf/releases, and download the latest release as a zip file under “Assets”. In most cases you will want to download the zip file ending in “x86_64”.
- Once you have the zip downloaded, right click -.> Extract it into a place you won’t delete.
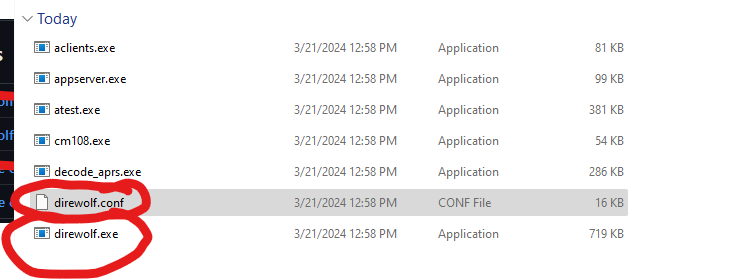
- Open the extracted folder, and note the “direwolf.conf” which we will edit in the next section. direwolf.exe will be the file we use to run the Direwolf TNC.
- Go ahead an open direwolf by double clicking ‘direwolf.exe’
- Once Open, you will see a list of audio input and output devices with numbers next to them. Note which numbers correspond with your soundcard interface microphone and speaker, then close direwolf.
- Press “Win+R” key on your keyboard, and type “mmsys.cpl” then press enter.
- Navigate to the “Playback” Tab, right click your Soundcard Interface Speaker out, and click properties.
- Navigate to the “Levels” tab, and make sure to set the slider to about half way, although you may need to adjust this later. Press “Ok” twice to close these windows.
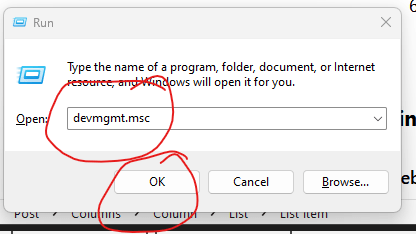
If you intend to use VOX without a PTT Line, you are done here, proceed to Basic Configuration. Otherwise, continue with steps 6 and 7 to get your COM port. - Press Win+R keys, type “devmgmt.msc” and press “OK”
- Once “Device” Manager opens, expand the “Ports” section and note the COM# listed
- Proceed to Basic Configuration.


Linux Installation Guide
Debian / Ubuntu / Raspbian / Raspberry Pi OS:
Prerequisites:
sudo package is installed, logged into a user that is not root, but is in the “sudo” group.
- First, we install all of the requirements to compile and run direwolf(this assumes you have sudo installed):
sudo apt-get update
sudo apt-get install git
sudo apt-get install gcc
sudo apt-get install g++
sudo apt-get install make
sudo apt-get install cmake
sudo apt-get install libasound2-dev
sudo apt-get install libudev-dev
sudo apt-get install libavahi-client-dev
sudo apt-get install alsa-utils
2. Then, we clone the repository, and compile direwolf:
cd ~
git clone https://www.github.com/wb2osz/direwolf
cd direwolf
git checkout dev
mkdir build && cd build
cmake ..
make -j4
sudo make install
make install-conf
cd ~
After following the steps above, you will have a new file called “direwolf.conf” in your user home folder, which we will be editing in the next section, as well as a “direwolf”executable in your user home folder.
3. Now, we must add your current user to the “dialout” group to make sure you have permissions to use COM ports. Make sure to replace “YOURUSER” with your current Linux username.
If you get permission errors later, you may just need to close your terminal session and open a new one.
sudo usermod -a -G dialout YOURUSERGet your Soundcard Interface:
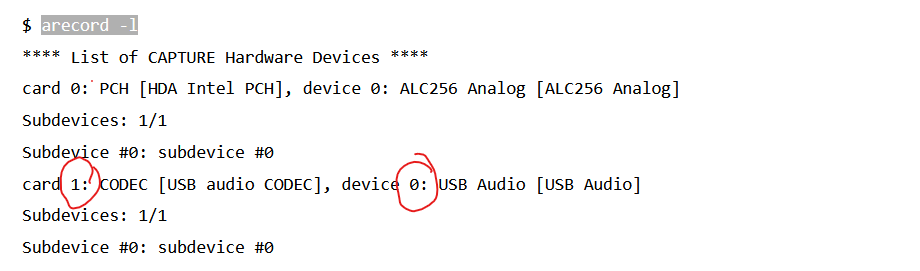
4. Run the following command to get a list of sound cards:
arecord -lYou will see a list of sound-cards and devices. Please note the Card#, and the Device# that corresponds with the soundcard you will use with direwolf. You will need these numbers in the next section.
Set your Volume, and make sure you are not muted.
5. In your terminal, run the following command:
alsamixerPress “F6” and select the soundcard you are using for packet radio.
Make sure that your speaker, and microphone are not muted. This in indicated by a “MM” at the bottom of your level bar. If your microphone or speaker have “MM” use the arrow keys to navigate to it, and press “M” on your keyboard to unmute them. Also be sure that your speaker volume is not tunred all of the way down. For now, set it to about 75%, and adjust later if needed. Set the “MIC” volume to about 10%. If you see a bar with “AGC”(Automatic Gain Control) on it, select it and ensure it is set to MM(Muted).
Press the [ESC] button on your keybaord, and enter the following command to store the settings:
sudo alsactl storeIf you are using VOX, you are done here and ready to move to the configuration section, otherwise continue to get your COM port.
Getting your Serial Port Path:
If you are using a GPIO pin for PTT, like that of a raspberry pi, you only need to now which pin is wired for PTT. You can find more information about using the PI GPIO for PTT here.
Otherwise, this assumes you are using a USB based serial connection like the digirig or to your radios serial port.
5. Type the following to list all /dev devices:
ls -l /devIF USING A USB BASED PTT LINE: Look for one with a path that resembles ‘/dev/ttyUSBX’
IF USING A SERIAL PORT ON YOUR MOTHERBOARD: Look for one with a path that resembles ‘/dev/ttySX’
This will be the serial path we use in the next section, so remember it.
Other Operating Systems
Direwolf also has support for Mac OS X, and Red Hat / Fedora / CentOS Linux. For instructions on installing direwolf on these operating systems, please refer to the official documentation here.
Base Configuration
Requirements
You should have the following information:
- Two numbers Related to your Soundcard
If using windows, it was the index of the microphone, and speaker listed when you ran direwolf.exe.
If using Linux, it was the Card# and device# of your soundcard after runningarecord -lhere. - If using a PTT line:
If using Windows, you should have a COM port in the formatCOMX.
If using Linux, you should have a COM port in the form/dev/ttyUSBXor/dev/ttySXfrom here. (Or a GPIO Pin if using PTT with a Raspberry PI) - The location of your direwolf.conf file
If on windows, it’s in the folder you extracted.
If on Linux, it is in your user home folder at~/direwolf.conf
Open the configuration file.
If you are on windows, go ahead and open direwolf.conf with notepad.
If on Linux, open the file for editing with the command: nano ~/direwolf.conf, or your favorite text editor.
Set the Audio Device in The Configuration File
If you are Using Windows:
Find the line “#ADEVICE 3 4“, remove the “#” from the beginning, and replace the “3” and “4” with the two numbers you found above for the soundcard interface.
The new line should look something like this:ADEVICE 2 3
If you are Using Linux:
Find the line “# ADEVICE plughw:1,0“, remove the “#” and the space afterwards. Replace the “1” and “0” with the CARD# and DEVICE# you found above for the soundcard interface.
The new line should look something like this:ADEVICE plughw:1,0
Set the PTT Device in the Configuration File (ONLY IF USING A PTT LINE)
A Note On RTS/DTR and PTT Configuration:
Please note that a Serial/USB PTT line can come in a few flavors of required signal:
RTS : Request to Send – Used for the Digirig
DTR: Data Terminal Ready
-RTS : Request to Send Inverted
-DTR: Data Terminal Ready Inverted
RTS -DTR: Request to Send, and Data Terminal Ready Inverted
RTS DTR: Used for the Easy Digi.
The manufacture of your radio or PTT Interface may have the information on which one of these you need. But often times, it’s a guessing game. Below, we will assume your interface is “RTS”, but just know that if you have issues with PTT, you may swap that out with one of the above.
On Windows:
Find the line: “#PTT COM1 RTS“, remove the “#“, and replace “COM1” with the COM# you found above.
The new line should look something like this:PTT COM3 RTS
On Linux using a USB/Serial PTT Interface:
Find the line: “#PTT /dev/ttyUSB0 RTS“, remove the “#“, and replace “/dev/ttyUSB0” with the /dev/ttyUSBX OR /dev/ttySX you found above.
The new line should look something like this:PTT /dev/ttyUSB0 RTS
On Linux using a GPIO PTT Interface(Like with a Raspberry pi):
Find the line: “#PTT GPIO 25“, remove the “#“, and replace “25” with the GPIO Pin you are using.
The new line should look something like this:PTT GPIO 22
Set the Speed
Find the line “MODEM 1200” and replace “1200” with your intended modem speed.
Typically, 1200 is the standard when operating on VHF/UHF.
300 is the current standard for operation on the HF bands, although this is likely to change soon with the data speed limitation lifted.
If you intend on working on HF, we can scan a few sets of frequencies to help with frequency calibration issues:
MODEM 300 1600:1800 7@30 /4 DEnable FX25
FX25 is an improvement over traditional AX25, and also has backwards compatibility. In simple terms, AX25 frames will fail to decode if a single bit is wrong. This leaves little room for error. FX25 is the solution to this. Although the frame size is slightly larger, it introduces additional error correction, allowing more packets to be successful. FX25 frames also contain the basic AX25 data in the middle of the packet, so any old TNC will recognize the packet anyways. If you intend on using HF connected Packet, you may opt to leave this out at your discretion, as it will double your transmit time.
To enable FX25, add the following line to the end of your direwolf.conf file:
FX25TX 1Set Some Optimizations and Tweaks
There’s one more set of parameters we must set.
For now, we will use a generic configuration, which should work for most radios. But, I will explain what they are as well so you can tweak them if need be. Just know that when we get into the BBS portion, we will revisit these options to tweak them.
At the bottom of your configuration file, add the following:
PERSIST 63
SLOTTIME 12
RETRY 5
FRACK 5
MAXFRAME 4
#Set MAXFRAME to 1 for HF Packet
#MAXFRAME 1
PACLEN 128
#PACLEN 64 FOR HF
DWAIT 0
TXDELAY 50
TXTAIL 40
PERSIST and SLOTTIME: go hand in hand. They introduce an element of “randomness” to when packets are transmitted to allow more than two stations to talk without collision, while giving each other turns to speak. You really should need to change these, but basically, we wait for SLOTTIME, and then generate a random number between 0 and 255. If that number is less to or equal than PERSIST, then we transmit. Otherwise, we wait for SLOTTIME again.
RETRY: is the amount of times we will try and send the same packet before giving up. The default is 10, but honestly if we aren’t able to exchange a single packet in 5 attempts, it’s not going to happen.
FRACK: is the amount of time in seconds to wait for acknowledgement of a packet. The default is 3, and 5-8 works well for HF Packet.
MAXFRAME: is the amount of frames we can send that go “unacknowledged” at a time. Bumping this value up will increase speeds, and generally 7 is a good number for good VHF conditions. If using HF Packet, the general recommended number is 1-2. I’ve put 4 here, which is an okay middle ground. If you find the other end struggling to receive you, I would lower this.
PACLEN: defines the amount in information that can fit into the data part of the frame. The Direwolf default is 256. Generally you want about 128 for Digipeaters, and regular nodes. For direct connections, such as BBS, or really good paths you want 256. On HF, where conditions can be rough, 64 is generally a good number at 300bps.
DWAIT: By default 0. This gives the radio time to switch from receive to transmit before starting to send packet data. If some rare cases, you may need to set it to 10-30.
TXDELAY: Gives our transmitter a little time to stabilize after TX is enabled. Sends some data to the buffer to get it “warmed up” so to speak.
TXTAIL: This forces PTT to stay open for some time after the packet has been sent to the sound card to make sure we don’t clip off the end. This is generally recommended to be at least 10, but you may have to turn it up on some radios, or if you have latency in your audio connection.
Test Your Configuration
Test by sending an audio tone:
Save your configuration file. We should now test direwolf to make sure everything is working as intended. If you have an additional radio nearby that you can tune to the same frequency, it will be helpful to ensure your dedicated radio is transmitting.
On Windows:
Open a Command Prompt or Windows Terminal in the folder where “direwolf.exe” is located. This can usually easily be done by holding “Shift” and right a blank space in your folder window.
Run the following command, which should toggle PTT and transmit an audio tone over your radio:./direwolf.exe -x a
On Linux:
Run the following command:direwolf -x a
You should see your radio begin to transmit, and you should hear audio tones on a nearby listening radio on the same frequency. Another great way to test your configuration is to just run direwolf by clicking it on windows or running “direwolf” on linux.
Press CTRL + C to stop direwolf.
If you have issues, proceed below for troubleshooting.
If not, you have a sucessfully installed instance of direwolf. Stay tuned for the advanced settings guide in the future for BBS and packet radio operation.
Test by Sending an APRS Beacon:
We can also test the TNC by sending actual packets to try and pick them up elsewhere, or check if they are igated via https://aprs.fi
Open up your direwolf.conf file, and find the line starting with “PBEACON delay=1 every=30 overlay=S“(The First One)

Uncomment the line by removing the “#”.
Replace the “30” after “every=” with “1” to send a beacon every one minute (remember to change this later).
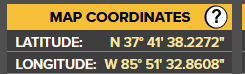
Visit the following website to get a good LAT/LON for your station https://www.findlatitudeandlongitude.com/. Replace the default LAT/LON with the one form the website.
(The first number form the site replaces the first number in the conf file. The second number from the site gets a decimal number added to the end, then gets the first two digits of the third number added to it after the decimal to create the second XX.XX number within your configuration file. )
In other words
This:
Changes to this:

You may also want to replace the comment, power, and height with your own.
In the end, my beacon line looks like the following:
PBEACON delay=1 every=1 overlay=S symbol="digi" lat=37^41.38N long=085^51.32W power=25 height=5 gain=4 comment="ELIZABETHTOWN, KY" via=WIDE1-1Save the file and start direwolf by double clicking direwolf.exe on windows or running “direwolf” on linux.
If all is well, you should be able to decode the packets form another radio as they are sent out every minute.
Fine Tuning Audio Levels
You may need to adjust your audio levels by radio. This is really important with HF packet. If you notice your ALC meter increasing when you transmit, it means you should lower your speaker volume on the computer. Likewise, if you see messages like “audio level to low/high” in direwolf,you may need to adjust your settings from your radio.
Starting Direwolf at Boot
We will start direwolf at boot within a “screen” which will allow us to interactive with it at any time.
Create a service file for direwolf using the following command:sudo nano /etc/systemd/system/direwolf.service
Paste the following:
[Unit]
Description=Direwolf
After=network.target

[Service]
Type=forking
ExecStart=screen -S direwolf -dm bash -c "direwolf -d kn -c /home/<YOUR_USER>/direwolf.conf; exec sh"
Restart=always
User=<YOUR_USER>
Group=<YOUR_USER>

[Install]
WantedBy=default.target
Make sure to replace all instances of “<YOUR_USER>” with your username without the brackets. (There are three)
Save the file, and issue the following commands:
sudo systemctl --user daemon-reload
sudo systemctl enable direwolf.service
sudo systemctl start direwolf.service
Now direwolf will be running in a “screen” session under the conext of our user. At any given time you can attach yourself to the direwolf instance with:
screen -r direwolfTo detach from the direwolf instance, press CTRL + A, and then press your “d” key.
Troubleshooting
You get “ERROR can't open device COM_DEVICE for channel 0 PTT control.” in the startup output
This means the COM port you’ve configured for your PTT Interface is not set correctly or you don’t have permission to use it. Check device manager within windows, or your /dev directory in linux to ensure you have them named the same. If they are named correctly, ensure no other piece of software is currently using that COM port. If you are using linux, ensure you have given your user permission to use the com port. You may also just need to exit your current terminal session and start a new one for your new dialout group to be in effect.
Your Radio does not transmit, and you are using a PTT line with no errors
This could mean that you have the wrong PTT serial port configuration.
Please open your configuration file, and experiment with swapping “RTS” with “DTR“, inverting them by using “-RTS” or “-DTR“. You may also need to try combining them like RTS -DTR.
Your Radio transmits, but does not stop.
Just like above, this could mean that you have the wrong PTT serial port configuration.
Please open your configuration file, and experiment with swapping “RTS” with “DTR“, inverting them by using “-RTS” or “-DTR“.
You could also have interference issues. Try to lower your power, and bring your radio further from your computer. You may also try installing ferrite beads onto your audio interface cable.
Your Radio does not transmit, and you are using VOX instead of a PTT line.
Please ensue VOX is enabled on your radio. The other issue could be that no sound is actually playing over your audio out line. Check your sound card interface to make sure you proeprly selected the correct numbers, and that your audio is not muted. You may also try turning your volume up.
Your radio transmits, but no sound comes with it.
This can be due to an improper audio device configuration, or a muted speaker. Check to make sure your audio device numbers are selected correctly, and check to make sure your speaker out is not muted.
Your radio Transmits, it sounds like a packet, but is not being decoded on the other end.
This is probably due to your TXTAIL or TXDELAY being too low. Try increasing each by about 10. If you get to 50 on each, try using DWAIT 10 as well.
You are not decoding packets.
Make sure the battery saver function on your radio is off. Make sure your squelch is open. Next, make sure that your soundboard interface microphone in is not muted. After this, try turning your radios volume knob up slowly to see if the volume was too low. double check your direwolf sound card interface to make sure it is using the correct one.
Going forward
From here you can create your very own IGate/digpeater using this guide. You may also use APRS clients on your computer or over the network. An example of which is PinPoint APRS, and you can check this out to set that up as well.
Video Guide
Sources
Official Direwolf user guide:
https://github.com/wb2osz/direwolf/blob/master/doc/User-Guide.pdf
Official Direwolf Raspberry pi guide:
https://github.com/wb2osz/direwolf/blob/master/doc/Raspberry-Pi-APRS.pdf
[…] Ultimate Direwolf TNC installation guide For Windows and Linux. The Modern Ham […]
[…] Check out the next post in the series to learn how to install and configure the Direwolf TNC by clic… […]
[…] You have the Dire-wolf Software TNC Installed and working for your radio with a PTT interface.(Click here if you don’t to get this up and running) […]
[…] you do not yet have a working direwolf setup, please follow the Ultimate Direwolf TNC Installation for Windows and Linux and then proceed below when you have a good digital radio […]
[…] you do not yet have direwolf configured, and do not have an existing packet TNC, check this out first to configure direwolf for your radio. I will also provide an example of using a serial […]
[…] If you do not yet have the dire wolf TNC working with your radio, please follow the documentation here. (Ultimate Direwolf TNC Installation Guide for Windows and Linux). Below is basically a copy/paste from the windows version for the explanation of APRS and […]
[…] is the next guide in the Packet Radio Series. If you don’t have a working TNC, check out the last post to get up and running. But the truth is, you don’t actually need a TNC to play with APRS, but […]