
Get Started with APRS on Windows with PinPoint and Direwolf
This is the next guide in the Packet Radio Series. If you don’t have a working TNC, check out the last post to get up and running. But the truth is, you don’t actually need a TNC to play with APRS, but we’ll talk more about that at that later. Just like always, we’re going to assume everyone is new here, and take it slow. This series is an introduction right?
What is APRS(Automatic Packet Reporting System)?
If packet radio gives us the ability to communicate data over RF, APRS gives us a language that everyone can understand. (Not that it’s the only one). APRS is great at delivering position reports over a specified time interval automatically. It also has the ability to send direct short form messages. That in itself is handy for EMCOMM, and situational awareness. With the addition of the APRS-IS(APRS Information System), and a wide network of volunteer I-Gates and Digipeaters, we now introduce the ability to communicate globally, and even send traditional SMS/Email messages routed via the internet.
Basic Vocabulary
I know nobody likes homework, but I promise you will have a better time knowing what these are going into it.
- APRS-IS (APRS Information System):
The APRS-IS was started in the 90’s as a way to show APRS activity on the web from RF for everyone to see. It has grown into a wide network of volunteer stations that network together called I-Gates(Internet Gateways). Now APRS-IS is a term to describe the network consisting of all of these internet gateways, and online systems that route packets between them, and the websites that show the data within it like https://aprs.fi. - I-Gate:
I-Gates are Internet connected APRS stations that relay traffic from RF to the APRS-IS. Often times, I-Gates can also relay traffic from the APRS-IS back to RF as well, (known as a TX I-Gate). Combined with the APRS-IS I-Gates give us the ability to send packets over a wide network reaching RF in other locations of the globe we couldn’t normally with our radio alone. - Digipeater PATH:
You can think of a digipeater much like a voice repeater, just a little “smarter”. APRS packets come with a “Path” in the header that gives special instructions how how the packet should be routed (or repeated). This path is usually in the format “WIDEn-N” where “n/N” is an integer. The first “n” outlines how many “Hops” you would like your packet repeated. A hop consist of a digipeater repeating your packet. So if you have a “2” in this position, that means you would like your packet repeated once more after the first time by another digipeater if it “hears” it. The second number, “N” acts as a counter for how many hops are left until the packet should no longer be repeated.
A good default path is Wide2-1, as you rarely need to get further than a single hop. Wide2-2 will get you to neighboring cities or states in some cases, and Wide3-3(don’t use this) can get you repeated across the country. The APRS network can get very congested due to the nature of this system, so always use the least amount of hops possible to achieve your goal. You can learn more about APRS digipeater paths here. - SSID:
Because many operators use APRS in different configurations, and sometimes at the same time, a special suffix system exists to tell others “what” you are. This suffix system comprises the numbers 0-15 and is appended to the end of your call sign. Example: “KN4MKB-7” means I am a handheld station. KB9VBR does a good job at explaining which ones are used for what on his blog post here. - Overlay Symbol:
APRS is a “visual” mode of communication, and so the stations that report positions contain a “symbol code”. This is the image that represents your station to others. Because transmitting these images over APRS itself would be slow, they are stored within your client software. This means they can look different between software packages, but really shouldn’t, as there is a standard. Most APRS software will hide the codes themselves away from the user, and instead offers a nice image selection menu, and handles the code for you behind the scenes. You can learn more about he overlay symbol codes used here. - BEACON:
A Beacon is an APRS packet that is transmitted at a regular interval. This can be a set time, or based on current speed and direction (also known as SmartBeaconing™ by HamHUD Nichetronix). These beacons usually serve to identify a station every 10 minutes, usually include a location and a comment.
Pinpoint Installation and Setup
You can download Pinpoint APRS from https://www.pinpointaprs.com/. Simply Right click -> Extract the downloaded Zip, and run the “setup.exe” included within it. Pinpoint actually has good documentation, so feel free to check it out here. Make sure that you have your TNC started. If using Direwolf, refer to the last post if you need help. Before we get started, visit https://apps.magicbug.co.uk/passcode/, input your amateur radio callsign, and note the “passcode” you are given back. We’ll need it in a moment.
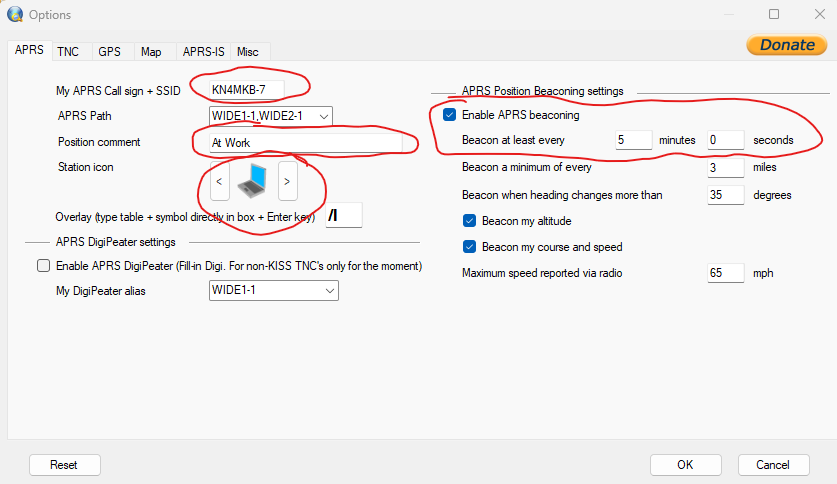
Upon Start you will be greeted with a setup window:
Make sure to adjust the circled portions with your own information.
These settings should be familiar and straightforward from the vocabulary list above.
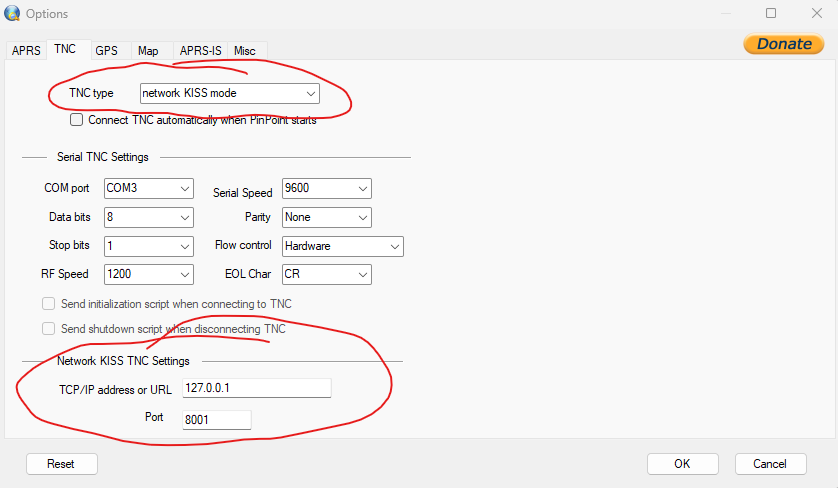
Next we’re going to take a look at the “TNC” tab:
If you are using the Direwolf TNC, select “network KISS mode” as the “TNC Type”. If it’s running on the same computer as Pinpoint, you can leave the network settings as their default. If you do not yet have a TNC, you can ignore these settings.
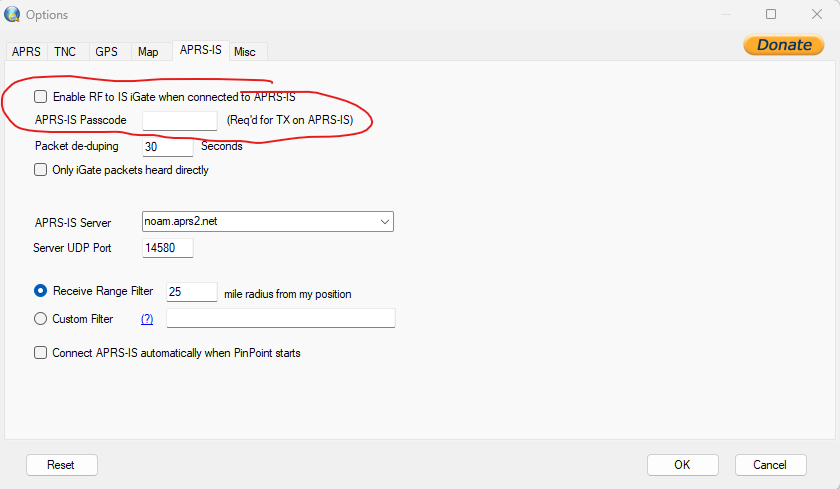
Now, let’s move on over to the APRS-IS tab:
If you would like act as an RX I-Gate, you can check the “Enable RF to IS iGate” Checkbox. Input the APRS-IS Passcode we obtained here earlier. This will allow us to pull information from the APRS-IS.
Using Pointpoint
You can now safely close the configuration window. We will now connect to the configured TNC, and (optionally) APRS-IS. To manually place your station location, find your location on the map, SHIFT+Left Click it and press “Set as my Position”
You should now see a message within Direwolf indicating that Pinpoint APRS has connected via KISS. You should also start seeing stations heard via RF(or APRS-IS) on the map.
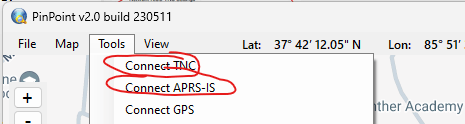
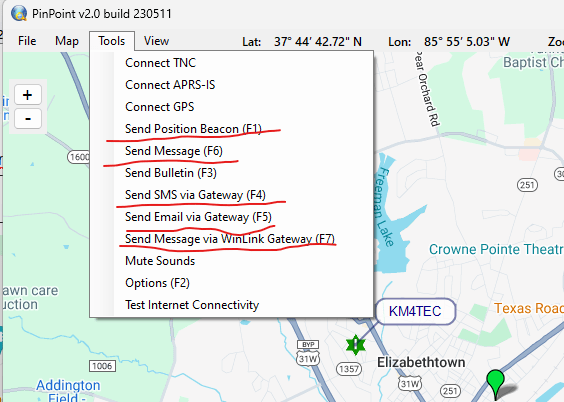
You can now start using all of those APRS functions we talked about before, including sending position reports, messages, SMS and email from the Pinpoint APRS “Tools” menu as seen here:
The “Last Heard” window will give you the ability to see all of the “heard” stations, expand them to see more details such as speed, direction, grid, and comments.
You can also use this window to see your “Inbox” for incoming APRS messages, as well as sent messages.

Going Forward
With the basics out of the way, and a working APRS client, you are ready to start exploring the world of APRS. You also have your own working I-Gate if enabled, and can are reporting RF packets to https://aprs.fi/ for yourself and the world to see. If you want to take things a step further, you can create your very own I-Gate/Digipeater following this guide using your existing direwolf setup! The packet radio series is just getting started however, as APRS is just the introduction. Next week, we will dive into the world of PBBS(Packet Bulletin Board Systems).
[…] is the counter blog post to the windows version with pinpoint here. The blog follows along with our Modern Introduction to Packet Radio. Please note, that before […]
[…] on your computer or over the network. An example of which is PinPoint APRS, and you can check this out to set that up as […]
Pinpoint not sending messages over RF, and no stations coming in under Radio Reports, all coming in under aprs-is reports. No errors show in direwolf for windows.
KO6ALP-9
Pinpoint not sending messages over RF, and no stations coming in under Radio Reports, all coming in under aprs-is reports. No errors show in direwolf for windows.
KO6ALP-9
Pinpoint not sending messages over RF, and no stations coming in under Radio Reports, all coming in under aprs-is reports. No errors show in direwolf for windows.
KO6ALP-9